The Challenge: Dental Lectures Sit Between a Textbook and an Operatory
Dental school faculty teach across a stack that has no equivalent in the slide tools they were given. A single fifty-minute lecture on, say, all-ceramic crowns has to move between materials science (lithium disilicate vs. zirconia, flexural strength, translucency), clinical procedure (preparation design, occlusal clearance, margin placement), digital workflow (intraoral scan, exocad design, CAM milling, glaze and stain), and case photographs from the faculty's own clinic. The same instructor next term has to teach implant prosthodontics, then a CE evening on full-arch digital workflows for general dentists who haven't touched a scanner.
PowerPoint decks survive in this world by accreting. Each year another lecturer adds three slides, drops one, and the deck drifts further from a clean teaching arc. Photographs are cropped from PDFs. Workflow diagrams come from manufacturer brochures. The slides at hour two of a residency seminar look noticeably different from the slides at hour one because they were built five years apart by different hands.
This guide walks through using ChatSlide to draft a complete dental lecture — restorative dentistry, prosthodontics, oral surgery, periodontics, oral pathology, or a CE workshop — in minutes, and then refining it for a D2 cohort, a resident seminar, or a continuing-education evening.
What Makes a Strong Dental Lecture Deck
Dental teaching is procedural and visual. Students arrive needing to do something — diagnose a lesion, choose a material, plan a flap, design a prosthesis — and the deck has to leave them able to do it the next morning in clinic. The structures that work in lecture halls and CE rooms:
- Open with a clinical case. A patient photograph, a complaint, a radiograph. "Forty-six-year-old female, fractured upper left central incisor on a chicken bone, asks if she can avoid a crown." The lecture's job is to answer that question.
- Anchor in a decision tree, not a paragraph. Restorative choices, periodontal staging, endodontic outcome assessments — every dental decision is an algorithm. One slide that shows the algorithm is worth three slides of prose.
- Show the procedure in steps. A numbered photo sequence — preparation, retraction, scan, design, try-in, cementation — beats a wall of bullet points. Students remember the order from the photographs.
- Compare materials and techniques side by side. Lithium disilicate vs. zirconia, resin-bonded vs. conventional bridge, surgical vs. non-surgical periodontal therapy. A two-column comparison slide is the most-photographed slide in any dental lecture.
- End on the failure modes. Marginal opening, debonding, screw loosening, peri-implantitis. The slide students write down is the one that lists what goes wrong and how you catch it early.
- A clinical case to close. Same format as the opener, different patient. Leave the answer in speaker notes so the slide works in class and as a self-study handout for boards review.
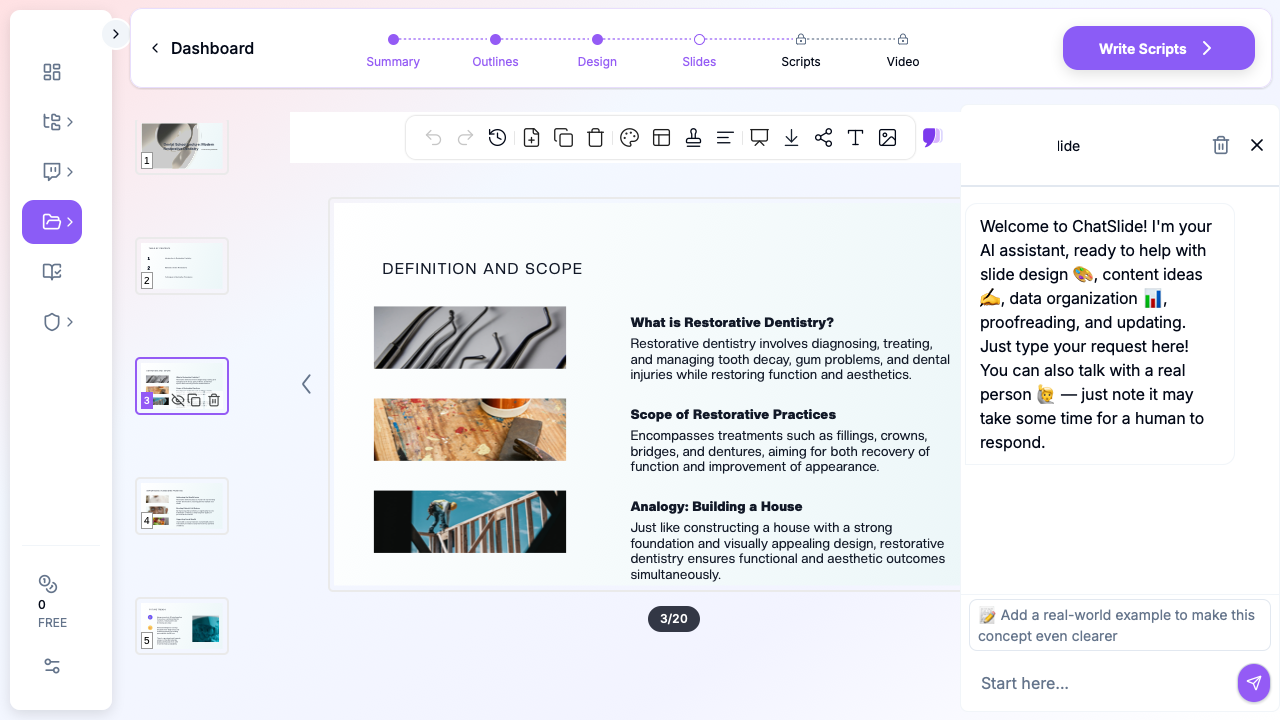
ChatSlide's *Education|Lecture scenario maps to this structure by default — opening case, sectioned procedure, materials comparison, failure modes, second case for self-study.
Step-by-Step: Draft a Dental Lecture in ChatSlide
1. Pick the scenario and write the audience concretely
In a new project, choose Education > Lecture. The audience field changes the deck more than any other input — write "Second-year dental students who have completed dental anatomy and operative pre-clinic but have not yet placed a class II composite on a patient" instead of "dental students". For a CE evening, write "General dentists 5–15 years post-graduation, comfortable with single-unit indirect restorations, considering adopting an intraoral scanner and chairside CAD/CAM for the first time".
The wider the experience gap inside your audience field, the worse the deck. Pick the audience you actually have and write to them.
2. Frame the topic as a clinical question
A topic of "All-Ceramic Crowns" produces a generic deck. A topic of "All-ceramic single-unit crowns for posterior teeth: choosing between lithium disilicate, zirconia, and hybrid ceramic for a patient with bruxism — preparation, scanning protocol, cementation, and adjustment" produces a deck with a worked clinical decision baked in. The same applies to other lectures:
- "Implant-supported overdenture for an edentulous mandible: two-implant Locator vs. four-implant bar-retained, with a focus on patient selection, surgical sequencing, and prosthetic protocol"
- "Non-surgical periodontal therapy in stage III grade B periodontitis: instrumentation, adjunctive systemic antibiotics, re-evaluation timing, and re-treatment criteria"
- "Endodontic retreatment of a previously root-canal-treated maxillary first molar with periapical radiolucency: case selection, isolation, instrumentation, and outcome assessment"
- "Digital workflows in maxillofacial prosthodontics: scanning protocols for intraoral and facial defects, CAD considerations for obturators and ocular prostheses, and material selection for printed and milled components"
The outline step shows you what you'll get before any slides render — adjust section count to 6 for a fifty-minute lecture, 8 for a doubled-up clinic seminar, or 4 for a CE breakout.
3. Re-architect the deck for the chairside moments
The first generation gives you the structure and the prose. Walk through and:
- Promote each procedural step into its own slide. "Preparation, retraction, scan, design, try-in, cement" is six slides, not a list on one slide. Each gets its own clinical photograph from your case library.
- Build a materials-comparison slide for every clinical decision. Two columns, three rows: indication, advantages, limitations. Students photograph that slide before any other.
- Replace generic dental stock photos with photographs from your own clinic — pre-op, prep, definitive, and one-year recall. ChatSlide's editor lets you swap the image block in two clicks; for figures you can't share for privacy reasons, generate a clean illustrated schematic in the AI image tool or paste in a textbook diagram you have rights to.
- Add a radiograph slide. A dental lecture without a radiograph isn't a dental lecture. Periapicals for endodontics, bitewings for caries detection, panoramics and CBCT slices for surgery and implants. Even a single bitewing showing the lesion under discussion grounds the entire deck.
- Insert a "common mistakes" slide between the procedure and the case. Open margin, undercontour, occlusal interference on a screw-retained crown, root perforation in retreatment — the failure modes are what residents need to recognize on their first attempt, not their tenth.
4. Pull in your guidelines and the literature you teach from
Upload AAE, AAP, AAOMS, ACP, AAOMR, ADA, and ICOI guideline PDFs into the project resources. Drop in the systematic reviews you cite — Cochrane reviews on restorative materials, AAP staging consensus, AAE outcome studies, FDI policy statements. Ask ChatSlide to extract the recommendations and citations into bullets, then drop them onto an "evidence" slide. Residents reading the deck for boards review will follow the citations back; students reading it before clinic will absorb the bottom line.
For digital workflow lectures, upload manufacturer protocols (3Shape, exocad, Medit, Align, Dentsply Sirona, Ivoclar) and ask ChatSlide to compare the steps side by side. The result is a vendor-neutral protocol slide that holds up in front of a mixed-vendor audience.
5. Use speaker notes for the chairside teaching
Speaker notes are where you write the demonstrations and tactile cues you'll narrate during the lecture: "Hold the scanner perpendicular to the occlusal surface; finish the occlusal sweep before moving lingual; capture the unprepared adjacent first to lock the bite". ChatSlide preserves notes through PowerPoint and PDF export, so they show in the presenter view at the front of the lecture hall and remain in the file the residents download for review.
6. Export for the LMS and the operatory
Export as PowerPoint for live teaching (so you can annotate radiographs and scan screenshots during the lecture) and PDF for posting to the LMS — Canvas, Brightspace, ExamSoft, or your school's residency platform. The PowerPoint export keeps the deck editable for next year's revision and for a co-faculty member who wants to fork your lecture for their own elective.
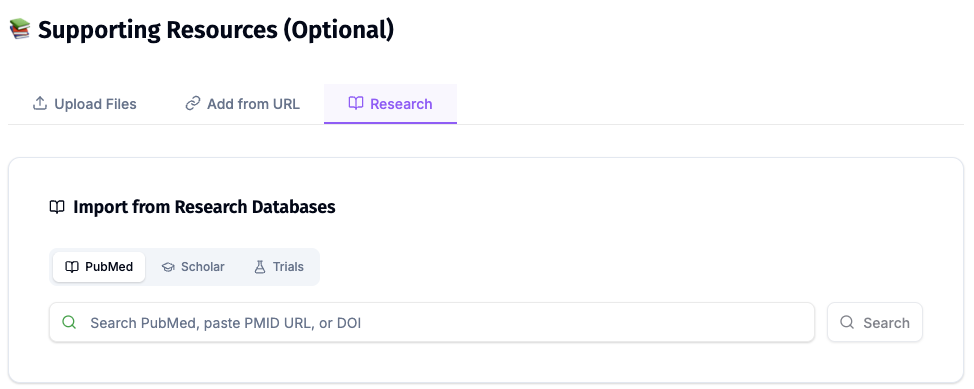
Direct Research Database Access
ChatSlide's Research tab connects to the databases physicians use daily:
- PubMed: Search by keyword, PMID, or DOI. Find the landmark trials, recent publications, and clinical guidelines relevant to your case. The AI reads abstracts and incorporates key findings into your slides with citations.
- Google Scholar: When your topic spans disciplines — say, the intersection of genetics and oncology — Scholar captures the broader academic literature that PubMed alone might miss.
- Clinical Trials (NCT): Presenting on a treatment where pivotal trials are ongoing? Search by NCT number or condition to pull trial design, endpoints, and status into your slides.
Tips for Dental Educators and Residency Program Directors
- Build a deck library by procedure, not by chapter. One deck per procedure (single-unit zirconia crown, three-unit bridge, two-implant overdenture, regenerative periodontal flap, retreatment endodontics, ridge preservation graft) is more reusable than a single mega-deck for "fixed prosthodontics." Each deck is its own teaching unit, and the residents who taught with it can pick it up next year and revise five slides instead of fifty.
- Standardize your deck template across the program. Visual consistency matters when residents are reviewing twenty hours of lecture content the week before mock boards; pick a theme and stay on it across operative, fixed, removable, periodontics, endodontics, and oral surgery.
- Plan didactic and clinic-specific lectures separately. A board-prep lecture on caries classification and a chairside seminar on rubber dam isolation are different decks. Write the audience field for each and don't try to merge them.
- Show the software the residents will use. A screenshot of your school's actual exocad, 3Shape Dental Designer, or DTX Studio screen is more useful than a stylized academic diagram. Residents recognize the buttons in the operatory the next morning.
- Lead CE workshops with a workflow case. General dentists at a CE evening need to leave with a workflow they can run on Monday — scanner, design, mill, cement — not a survey of every ceramic material on the market. Open with the workflow and let everything else hang off it.
- Save the source PDFs in the project. Next year's lecturer (or future-you) can rebuild the deck without hunting down the source guideline PDFs and case photographs.
- Tag photos by patient consent status. A clinic-photograph slide library is a teaching asset that lives across decks; tag every image by the consent the patient gave (school internal, conference, social media) so the deck you build for an in-school lecture doesn't accidentally end up at the conference podium with a non-consented photo.
Subspecialty Notes
- Prosthodontics. Lead with the prosthetic design before the surgery. Implant courses that open with surgery and retrofit a prosthesis at the end produce residents who plan implants by where the bone is, not where the tooth needs to be. Show the wax-up, then the surgical guide, then the placement.
- Maxillofacial prosthodontics. Digital workflows have collapsed the gap between cranial and dental prosthetics. A lecture on obturators or ocular prostheses should walk through facial scanning, mirror-image CAD, and printed try-ins as one continuous workflow — not three disconnected modalities. The 2026 cohort expects to see the scanner and the printer in the same slide.
- Periodontics. Stage and grade in the same slide as the radiograph. The 2018 classification still trips up D3 students because they meet it as a table; meet them with a stage-and-grade slide built around an actual periapical series.
- Oral surgery. Anatomy first, technique second. A third-molar lecture without a CBCT slice through the inferior alveolar canal is a CE talk waiting for a complaint. Drop in a CBCT screenshot from your school's collection on every surgical decision slide.
- Endodontics. Microscope view, not loupe view. An endodontic lecture in 2026 should show what the resident will see down the microscope — orifice, canal, accessory canal, working length film — and not what a textbook diagram of canal anatomy looks like.
- Restorative. Magnification, isolation, adhesion. A class II composite lecture that doesn't show the rubber dam is a class II composite lecture that produces leaky restorations.
- Oral pathology. Histopathology and clinical photograph on the same slide. Students who only see the histopath miss the lesions in clinic; students who only see the clinical photo can't reason through differentials.
Get Started
Open ChatSlide, choose Education > Lecture, and paste in the next lecture topic on your syllabus — a clinical question, an audience description, a section count. The first deck is in your hands in minutes; the rest of the afternoon is for the case photos, the radiographs, and the speaker notes that turn an outline into teaching.
For dental school faculty redesigning a course around digital workflows, for residency program directors building a board-review series, or for CE instructors preparing an evening workshop, ChatSlide replaces the deck-accretion problem with a deck-library starting point. Try it at chatslide.ai or app.chatslide.ai.
A note on patient data and HIPAA. ChatSlide's standard plans are not a HIPAA-covered service — keep PHI out of slide content, prompts, and uploads. For hospital systems, group practices, and clinics that need a Business Associate Agreement, our Enterprise plan offers HIPAA-compliant deployment options — contact us to discuss BAA terms, SSO, and private-cloud or on-prem hosting.